How to Fade In And Out Audio with FilmoraGo
Fade in and out audio plays an important role in audio editing. While making it easier than ever. FilmoraGo is here to add some more to it. Find out more with us in this guide.
- Part1. What is Fade in and Fade Out
- Part2. Some Tips When Making Fade Effects
- Part3. Steps to Fade In Audio with FilmoraGo
- Part4. Steps to fade out audio with FilmoraGo
Part1. What is Fade in and Fade Out
As a novice, you've likely caught wind of sound fade in and fade out a couple of times, and you've been thinking about what it is and how you can utilize it to improve your recordings. A sound fade-in is fundamentally the reformist expansion in the volume of a sound sign. Generally, a fade-in is made marginally more limited than its relating grows dim. Nonetheless, to have a smooth outcome, it would be a good thought to set your fade in and become dull at five seconds.
Then again, a sound fade-out alludes to the continuous diminishing in the volume of a sound sign. In case you're transferring a different sound document into your video editorial manager, guarantee that the sound isn't longer than your video cut. For instance, if your video cut is one moment, the sound you wish to fade ought not to be longer than one moment. This is to empower your music to become dim consistently.
Much of the time, you may have to manage your soundtracks to get them fit as a fiddle. You'll figure out how to do that before the finish of this aide. This marvel is applied in videography to deliver an additional layer of polished skill, particularly when the tune's end is excluded from the video.
every beautiful moment in life.
Install FilmoraGo Now!


Part2. Some Tips When Making Fade Effects
Assuming you are paying attention to a sound, you may feel awkward if the track out of nowhere starts or finishes with a similar volume as the entire one. Try not to stress since you can fix this issue effectively with the Audio Fade include. The impact permits you to make smooth changes between your brief snippets to make a consistent listening experience for your crowd.
Essentially, Audio Fade is an impact utilized in sound altering to make the sound slowly increment or diminishing the sign level. It's helpful particularly in smoothing the start and end of a soundtrack.
Sound Fade contains Audio Fade in and Audio Fade Out. At the point when you need the start of the sound to bit by bit increment from quietness, you can utilize the Fade in actuality. Interestingly, the Fade Out impact is useful to diminish the sound to quietness.
You may also like: How to Extract Audio From Videos On iPhone
Part3. Steps to Fade In Audio with FilmoraGo
FilmoraGo App for iOS users as its launch to Apple Play Store turns out to be the most useful audio editing platform. To perform the Fade-in/fade-out operations with this application, here we’ve enlisted the steps for both Fade-in and Fade-out phenomena.
Step 1: Download and install the FilmoraGo App
To dive into the audio enhancement techniques with FilmoraGo, you first need to download and install this software from the links below which we have brought here for you as follows.
Now as you’ve downloaded the executable file of this application, the next step is to install it accordingly, and to do that, just use the default installation procedure which will surely lead you towards the successful installation of this intuitive program.
Step 2: Import the music files
Now in the next step, this software allows you to perform the live recordings with the addition of webcam recording, screen recording, and the recording of your system sound and microphone sound separately and in parallel. Hence, to proceed with the recording of sound lively, hit the New Recording button available to you at the initial launch of the app as follow:
Now if you want audio editing in FilmoraGo to your previously recorded music file or video file then you must opt for the Video Editor button at the starting interface as follows:

Step 3: Drag and Open the File in Timeline
In either case, I-e to perform live recording or to edit pre-recorded audio, you must be brought to the video editor of FilmoraGo where you can perform the sound engineering without any prior experience.
To do that, after the successful import of your sound recordings to this software, drag and drop them from the media library to the timeline at the bottom of this software as follows:

Now you shall preview your sound files within the timeline where you can crop the video or trim the audio of the concerned audio file within the timeline handily.
Step 4: Apply Fade-in Effect
To proceed with the fade-in music, right within the timeline where you have previously added the audio files, select your desired audio file and hold it to select the Edit Audio menu from the list as follows:
Note: You can also proceed to the Audio Editing window just by selecting the audio file within the timeline which will open up the Audio Editor at the right corner of the software interface.

Note: These Fade-in circles would only be visible to you if you’ve previously edited the audio files, I-e to enable those options, simply right-click over the audio file and select the Edit Audio option, only that’ll bring you these options for fading-in/fading-out.
Step 5: Adjust the Audio Speed and the Volume.
Also, to fade in music, the best part with FilmoraGo is that you can also perform the audio editing in FilmoraGo with its built-in audio editor. To advance with the audio editing, select the audio file within the timeline as follow:

In addition to that, you can also perform the audio speed altering with this software just by regulating the Speed menu within the Speed section of the audio editor:
Step 7: Export and share
Now as you’re done with the solution to how to edit audio in FilmoraGo, there’s the last step that will give you the final and usable output file right within your PC.
That’s an export option with which you can export your audio files to your desired format and your desired location within your system. To proceed with that, hit the Export button situated at the top-right corner of the screen as follows:
Soon after customization of the audio file hit the Export button situated below which will eventually take you to save your audio file to the desired iPhone location.
Part4. Steps to fade out audio with FilmoraGo
Step 1: Launch the App
To proceed with the Fade-out, launch the FilmoraGo from the Home Screen:
Step 2: Open the File
Now within the app intuitive interface, open the desired audio file to apply this effect:
Step 3: Fade Out Music File
Now in the main step, here’s the kicker with the FilmoraGo as you can easily hover over the audio file within the timeline where you can see the white circle filled with pink color at the starting end of your audio file, that’s the fade-in audio button within your audio file as follows:
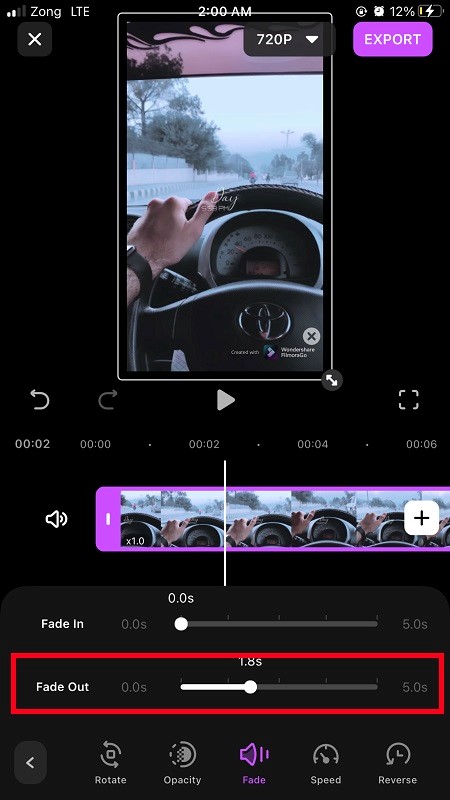
Now to opt for the fade-out audio, the other end of the audio file within the timeline which you have selected has the pink circle, drag the circle to fade out the music file with a single click and dragging phenomena as follow:
Step 4: Edit Final Audio
Lastly, after applying the Fade out effect, you can perform various editing techniques. You can easily adjust the volume of your fade in/fade out music by changing the volume slider within the audio menu as follow:
Step 5: Share the File
Now here’s the kicker with the FilmoraGo as you can perform the sharing of your music files directly to your YouTube channel right from the Export section of App. To proceed with that, hit the YouTube menu section as follows and sign in to your YouTube channel to perform the sharing of your music file.
You can also perform the Denoise operation via audio editor with the enabled slider.
You may also like: How to add music to YouTube video with FilmoraGo

