How to do a GIF as the Background on iPhone/Mac
It is a fact that most people especially the newer generation do not like monotony in their life. It is true when it comes to even the smallest of things such as your iPhone and Mac background. The stationary wallpapers on your Apple devices can get quite boring and dreary.
Apple has provided an option of giving you something close to a GIF as wallpaper, which is the live wallpaper but Macs only support static images. The file formats supported for iPhone wallpapers are JPG, JPEG, and PNG. For Macs, the supported formats are JPEG, PICT, TIFF, PNG, or HEIC.
This certainly does not mean that it is entirely impossible to set GIFs as wallpapers on your iPhone and Mac. The good news is that there are a lot of apps that help you set animated GIFs as wallpapers. However, there is a catch to it.
The animated wallpapers might look good but they might also drain the battery of your devices relatively faster. It is especially suggested to stay with your motionless backgrounds on your device especially if you have an older device.
Also, the apps used for this purpose might not be that stable. You will learn how to set wallpapers as GIFs on iPhone and Mac right here.
Section1. How to put a GIF as your background on iPhone
Section2. How to put a GIF as your background on Mac
Section 1.How to put a GIF as your background on iPhone
iPhones come with a built-in live wallpaper option which you can use and Apple has provided a few live wallpapers for iPhone. Still, if you want to add an animated wallpaper of your own choice you can follow the following steps:
● First of all, you need to find the wallpapers you would like to choose for your iPhone background. GIPHY and Tenor are two of the best places to find animated wallpapers.

● Once you have found your desired wallpaper, select the image and you will see three dots in the bottom right corner of the image. Click that and choose the Convert to live photo option.
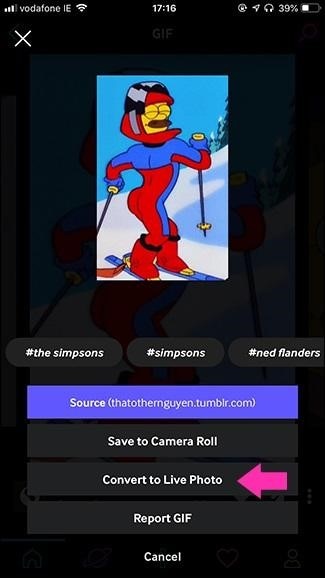
● This will open another option which will give you two options.
Save as live photo (Full Screen).
Save as live photo (Fit to screen).

Full-screen crops your live photo so it can take up your whole screen while Fit to screen adds black bars at top and bottom. Select your desired option and continue to the next step.

● It is now time to set your wallpaper. Go to Settings > Wallpaper > Choose New Wallpaper. Select Live photos and choose the wallpaper you just recently saved.

● The next step is to position the GIF as desired and tap Set. iPhone will let you choose your new wallpaper as either home screen or lock screen or both. Choose the option you like. 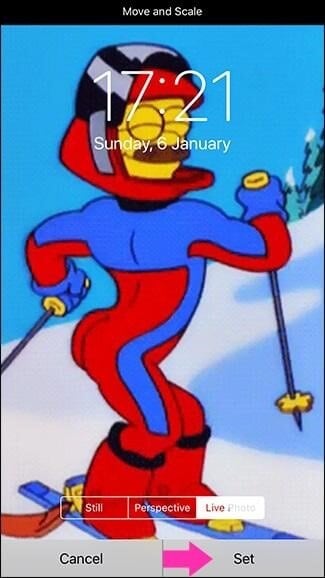
With these easy steps, your GIF background is ready but there are a few things you need to keep in mind while choosing your background.
- The iPhone wallpaper is always vertical so make sure that the wallpaper you select is also vertical or you will be stuck with small or cropped wallpaper.
- Live wallpapers are motionless most of the time so make sure you choose the wallpaper that also looks good when static.
- GIFs mostly have a low quality so try to find something that is a little high quality as the new iPhones come with high screen resolution.
Now that you have learned how to choose GIF as iPhone background now it is time to learn how to set GIF as your Mac background.
Section 2.How to put a GIF as your background on Mac
The Mac’s OS X only supports still backgrounds but it is possible to set GIF backgrounds on your Mac with a little utility called GIFPaper, Here is how you can add some zest to your boring Mac background:
● Download the GIF you would like to set as your background. You can use GIPHY or Tenor for this purpose as they have a range of different GIF options.
● Download the GIFpaper app from your browser and extract its contents to your chosen folder.
● Find and double-click GIFPaperPrefs.prefPane in the folder you have extracted the app contents.
● Next, go to System preferences on your Mac and select GIFPaperPref to launch your app.
● Select Browse, select the chosen GIF, and choose Axes Independently in the scaling options.

After the last step, your background will be changed to your preferred GIF. In case, you have several virtual desktops you will have to repeat the same process for each separately. It is because with this process only your current screen background will be changed.
Another thing to keep in mind is that, if you have an older version of Mac, this might not be a good idea. Choosing a GIF background on an older system will cause it to consume system resources.
Conclusion
Gone are the days when people used to keep the same old mind-numbing still backgrounds for their iPhones and Macs. People like to keep things a little more interesting that is why it is suggested that you change your lackluster wallpapers on your iPhone and Mac to something with life such as a GIF.
It is tremendously easy to achieve that with few easy steps on both your Apple devices as taught above. Within just a few minutes you can make your Mac background much bubblier than before. It takes even less time to do it on your iPhone.
There might be a few drawbacks of it on your device but you need not worry about it if your device is new. So what are you waiting for? Go now and bless your device with some great new wallpaper with motion.